How to Root OnePlus Ace 3 Pro PJX110 ? – fastest method

Preparations Before Rooting
Backup Your Data
Before starting, ensure you back up all important data on your phone as rooting can lead to data loss.
Install ADB and Fastboot
- Download and install Android SDK Platform Tools. Here
- Fastboot (Bootloader Driver): Here
- Download and install fastboot driver (after install done >> close app)
File root:
init_boot.img (china rom – patched): Download
Magisk app apk: Download
More Services
Buy Unlock OnePlus Ace 3 Pro call block Services
Unlock Bootloader OnePlus Ace 3 Pro
- Turn on usb debugging
- Go to setting >> about phone ≥> version ≥> build number (version number) >> click 8 time to build number (version number)
- Back to setting ≥> additional setting >> developer options ≥> usb debugging ≥> turn on, OEM Unlocking >> Turn on
2. Connect phone to pc
After connect >> check phone (File transfer/android auto click), Allow (alway tick) click (IF HAVE)
3. Extract “Platform Tools” and click “open_a_terminal_here.bat”
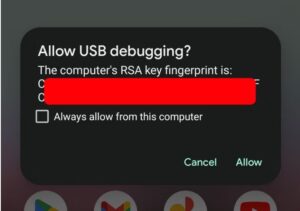
4. Enter adb devices then ( Tick “alway allow from this pc” >> allow (ok) click)

5. Finally, re-enter the command from step 4. If everything was successful, you should now see your device’s serial number in the command prompt/Terminal window.
6. witre to platform tools
adb reboot bootloader
fastboot flashing unlock
now check phone : volume down button click >> unlock the bootloader >> power button click

Root OnePlus Ace 3 Pro PJX110
- after unlock bootloader >> setup phone again (skip all step)
- Do step 1 -4 again >> go to bootloader
- Now you can see UNLOCKED
- Coppy init pjx110_boot_patched.img + pjx110_init_boot_patched.img to same folder (Platform tools folder)

- witre to platform tools
fastboot flash boot pjx110_boot_patched.img
fastboot reboot fastboot
fastboot flash init_boot pjx110_init_boot_patched.img - now fastboot reboot
DONE <3. Thanks for watching


